


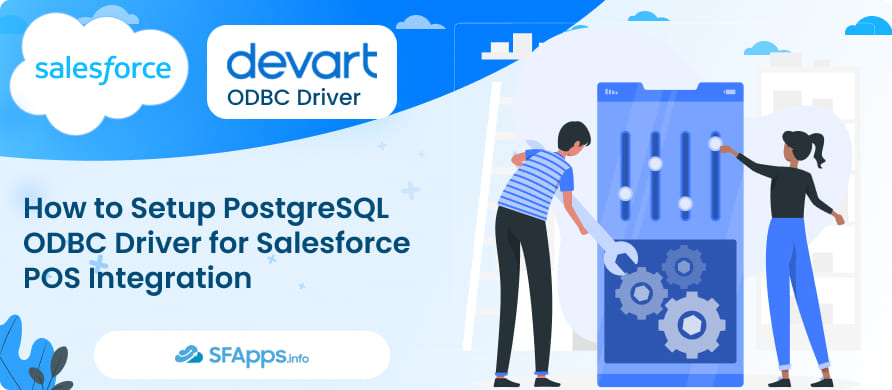
Connected Retail: How POS Integration With Salesforce Solves Retail Data Gaps
Retailers often face integration problems, such as collecting data in a single “source of truth,” for example, by connecting their POS systems to Salesforce CRM.
Store-level POS systems (like those using PostgreSQL databases) often run independently, while Salesforce holds critical customer and sales data at the corporate level. This disconnect creates silos, making it difficult to achieve a unified view of retail operations.
As a result, many companies face reporting delays, manual data transfers via CSV files, and missed opportunities for real-time insights. Imagine relying on weekly CSV exports from each store’s POS, then importing them into Salesforce by hand – this process is time-consuming, error-prone, and limits your ability to make timely decisions. Data in Salesforce might lag days behind actual sales, meaning your decisions are based on outdated information.
This isn’t just a theoretical problem. In 2024, Salesforce reported that AI-driven personalization and agent-assisted shopping experiences influenced $229 billion, 19% of all online orders during the holiday season. This underscores the critical role of real-time POS data and AI in boosting conversion rates and enhancing customer engagement.
At the National Retail Federation 2024, Salesforce announced that 83% of global retailers experienced improvements in operational efficiency through adopting AI technologies. Integrating POS data with AI tools enables retailers to optimize inventory management, personalize customer interactions, and streamline operations, leading to increased profitability.
Disconnected systems make it nearly impossible to correlate store sales with CRM data in real time. This means missing key insights about customer behavior or inventory needs, which leads to missed revenue, stockouts, or poor customer service.
The solution is straightforward: integrate your POS system with Salesforce using a reliable data bridge. In this guide, we’ll show you how to connect a PostgreSQL-based POS database to Salesforce using Devart’s ODBC drivers.
- Why Devart ODBC Drivers Are the Right Fit
- Step-by-Step Guide to Salesforce POS Integration Using ODBC Drivers From Devart
- Step 1: Identify Salesforce and POS Systems
- Step 2: Install the Devart PostgreSQL ODBC Driver
- Step 3: Install the Devart Salesforce ODBC Driver
- Step 4: Set Up ODBC Data Sources (DSNs) for PostgreSQL and Salesforce
- Step 5: Test the ODBC Connections
- Step 6: Map POS Tables to Salesforce Objects
- Step 7. Choose an Integration Method
- Step 8: Ensure Secure Data Transmission
- FAQs About Salesforce POS Integration Using ODBC Drivers
- 1. What is the role of the Devart ODBC drivers in Salesforce POS integration?
- 2. Do I need to be a developer to integrate a POS system with Salesforce via ODBC?
- 3. How secure is this ODBC-based integration between Salesforce and a POS database?
- 4. What data can I sync between a POS system and Salesforce?
- 5. How frequently should I sync data, and will this integration support near real-time updates?
- Bringing It All Together: Secure and Scalable Salesforce POS Integration
This step-by-step approach will walk you through installing and configuring the drivers and securely syncing your data, eliminating the need for manual file uploads and unlocking real-time visibility across your retail network.
Why Devart ODBC Drivers Are the Right Fit
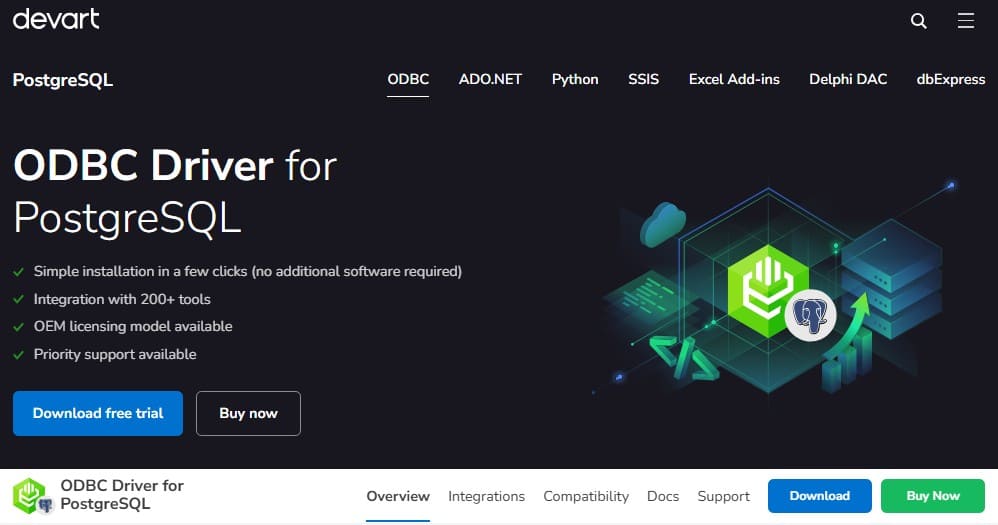
To connect PostgreSQL-based POS systems with Salesforce reliably, especially in a Salesforce retail POS scenario where transaction data must move quickly and securely, you need a “bridge” that is stable, secure, flexible, and optimized for bi-directional integration. That’s exactly what Devart’s ODBC Driver for PostgreSQL and Devart’s ODBC Driver for Salesforce provide.
The PostgreSQL driver enables fast, compliant SQL access to store-level databases, even over secure, encrypted connections. On the other side, the Salesforce driver allows applications and scripts to treat Salesforce as a relational data source, supporting standard SQL commands like SELECT, INSERT, and UPDATE. Because both drivers expose PostgreSQL and Salesforce as ODBC-compatible data sources, you can use popular ETL tools (like Skyvia or SSIS) or write your own scripts (e.g., in Python or PowerShell) to automate the data transfer between your POS system and Salesforce.
Both drivers are easy to install, support 32- and 64-bit systems, and are compatible with all major BI and ETL tools. With built-in authentication (including OAuth 2.0 for Salesforce), connection pooling, bulk loading support, and precise control over ODBC settings (like connection timeout and logging), Devart provides a solid foundation for POS integration at enterprise scale.
Step-by-Step Guide to Salesforce POS Integration Using ODBC Drivers From Devart
Before we take a closer look at how to set up ODBC connection between PostgreSQL and Salesforce, let’s ground this guide with a practical scenario that shows why this kind of integration matters.
A growing retail chain faced a familiar challenge: each store operated a local PostgreSQL-based POS system, while the corporate team relied on Salesforce for customer management and analytics. But without a real-time connection between the two, the head office had no visibility into daily store performance. Staff were forced to manually export data as CSV files and upload them into Salesforce – a slow, error-prone process that made it difficult to act on current sales data.
This example shows the kind of inefficiency that this PostgreSQL ODBC driver installation guide aims to eliminate. Now, let’s walk through how to integrate PostgreSQL and Salesforce using Devart ODBC drivers on the example of a Windows computer.
Step 1: Identify Salesforce and POS Systems
Begin by outlining the systems and data you need to connect. Identify the PostgreSQL database details for your POS system (server address, port, database name, user credentials), and have your Salesforce login information ready. Ensure you have access rights to both systems (for Salesforce, you may need an API-enabled user and possibly a security token if not using OAuth).
It’s also wise to define which data you want to sync – for example, sales transactions, inventory levels, or customer info from the POS system integrated with Salesforce. Having a clear integration plan will guide the configuration. Essentially, we’re linking two worlds: the local store database and Salesforce’s cloud database. With that in mind, let’s proceed to set up the connectivity.
Step 2: Install the Devart PostgreSQL ODBC Driver
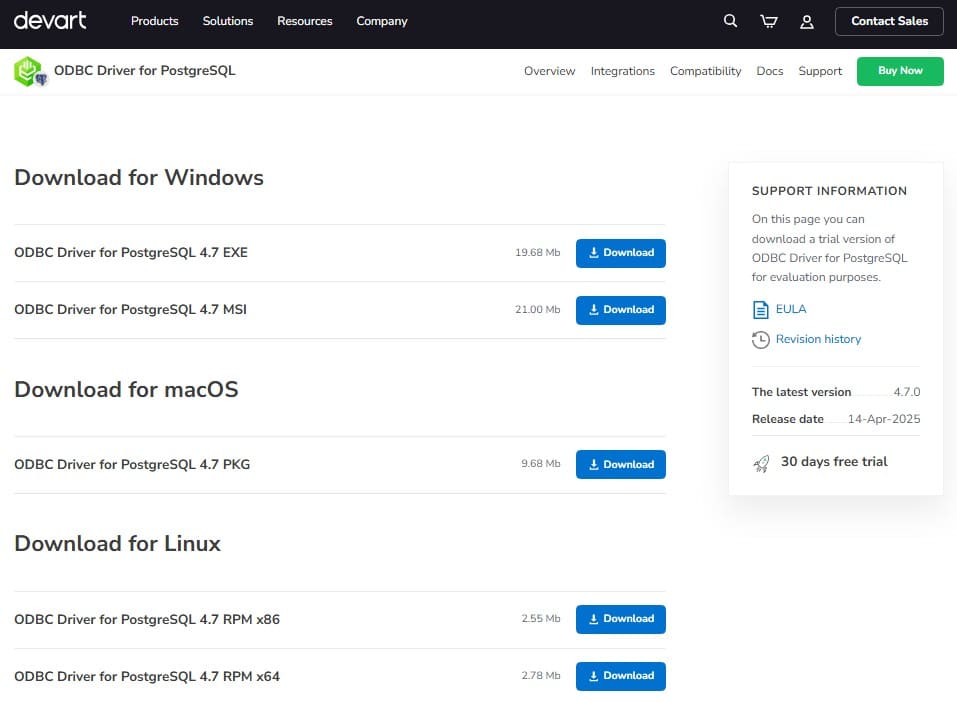
The first technical step is to install the ODBC driver for PostgreSQL on the machine that will run the integration. This could be a back-office server or even a manager’s PC that will host the data sync. Devart provides a dedicated PostgreSQL ODBC driver that we’ll use for the POS connection. Here’s how to get it installed:
1. Download the Devart ODBC Driver for PostgreSQL: Visit the official Devart page for the PostgreSQL ODBC driver and download the suitable installer.
- Please note that you need to create a Devart account to download the installation packages, and it also gives you access to the Devart Customer Portal, where you can conveniently monitor the status of your Devart products.
2. Run the installer: Launch the downloaded installer file. An installation wizard will guide you through the setup.
- If prompted by Windows security, allow it to run.
- Accept the license agreement when prompted.
- Choose the installation directory (the default is usually fine) and whether to install the 64-bit version (you likely want this unless you specifically need 32-bit for an older application).

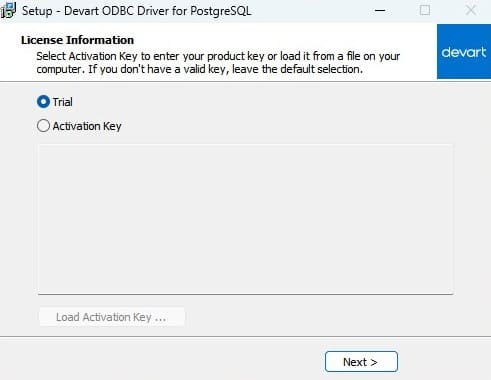
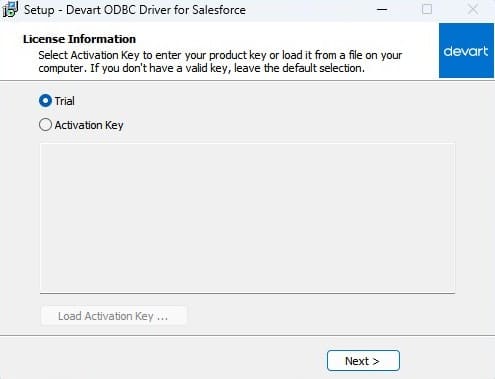
3. License or Trial: If you have not yet purchased a license, select the Trial option to install a fully functional trial (Devart’s trial typically lasts 30 days, which is enough to set up and test the integration).
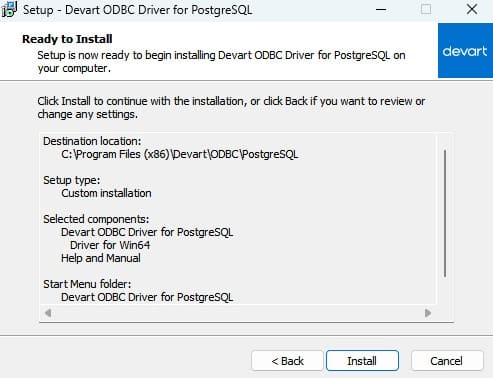
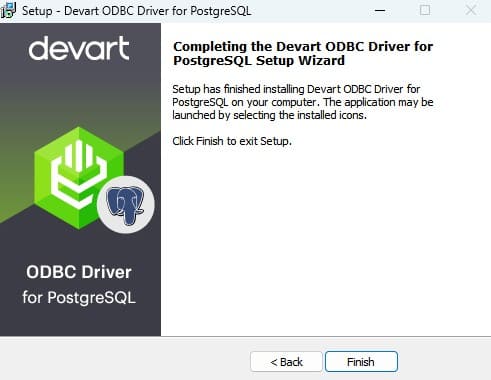
4. Complete installation: When all the necessary installation options are selected, you will see the “Ready to install” screen. Click “Install” and wait for confirmation of successful installation. The PostgreSQL ODBC driver is now installed on your system.
Step 3: Install the Devart Salesforce ODBC Driver
Next, we need to install Devart’s ODBC driver for Salesforce on the same machine. This driver will allow us to connect to Salesforce. The process is similar to the PostgreSQL driver installation:
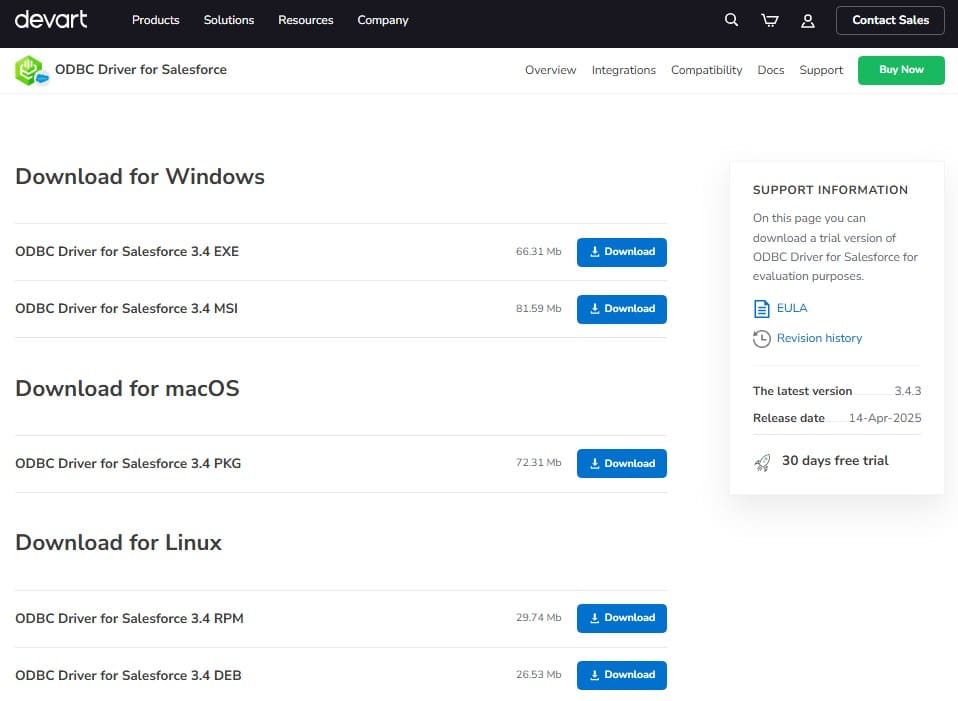
1. Download the Devart ODBC Driver for Salesforce: Get the installer from Devart’s site here: Devart ODBC Driver for Salesforce. Ensure you choose the correct version for your operating system.
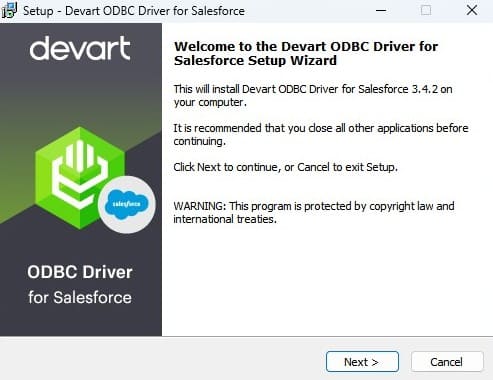
2. Run the installer: Launch the Salesforce ODBC driver installer. Go through the setup wizard.
- Approve any security prompts to begin installation.
- Choose the destination folder (default is fine).
- On the Select Components screen, opt to install the same 64-bit driver version as for the PostgreSQL driver (and 32-bit if needed).
3. Provide license information: Select the Trial option to proceed without purchasing a license (the trial will also run for a limited period, such as 30 days).
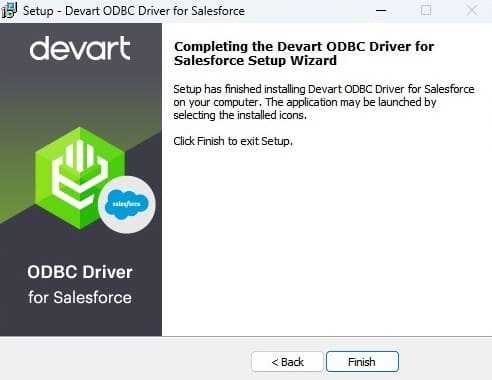
4. Finish installation: Click through the wizard, then click “Install”. Once the installer completes, click “Finish”. The Salesforce ODBC driver is now installed.
Step 4: Set Up ODBC Data Sources (DSNs) for PostgreSQL and Salesforce
With both drivers installed, the next step is setting up ODBC connection entries for each system, known as Data Source Names (DSNs). A DSN stores the connection info (like server address, user, etc.) so applications know how to connect. We will create one DSN for the PostgreSQL POS database and another for Salesforce:
1. Create a PostgreSQL ODBC DSN:
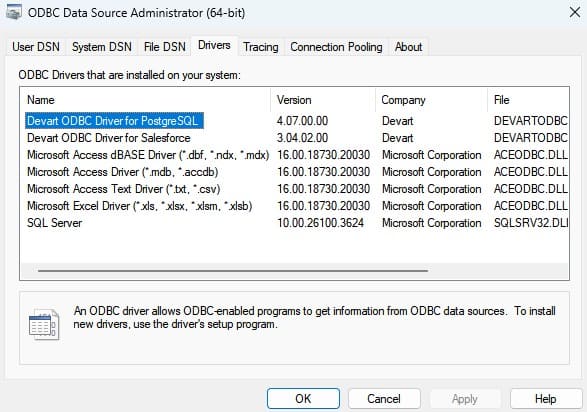
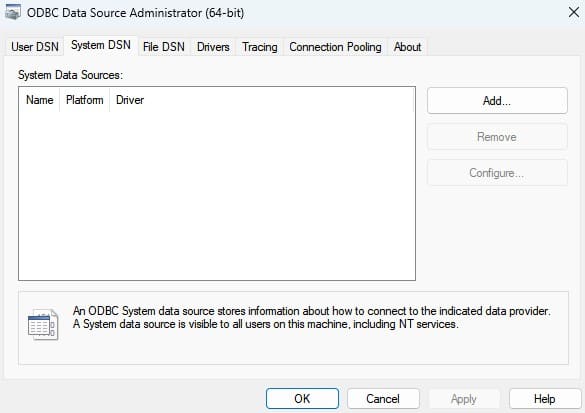
- Open the ODBC Data Source Administrator on Windows. You can find this by typing “ODBC” in the Windows search. Be sure to open the version matching your driver’s bitness: if you installed 64-bit drivers, open ODBC Data Sources (64-bit).
- In the ODBC Administrator, go to the System DSN tab (choose User DSN if you prefer the DSN only be available to the current user; System DSN makes it available system-wide).
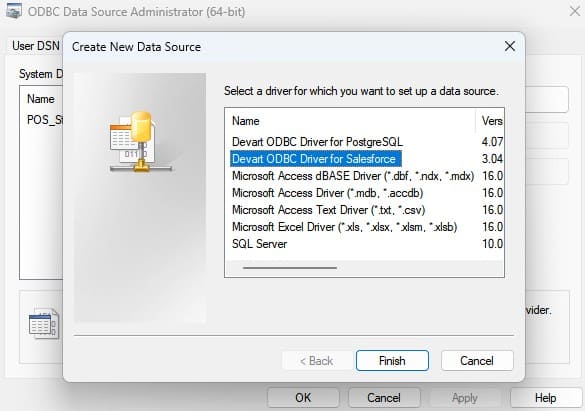
- Click “Add…”, and in the “Create New Data Source” dialog, from the list of drivers, select Devart ODBC Driver for PostgreSQL, then click Finish. This will open the Devart PostgreSQL ODBC Driver Setup dialog.
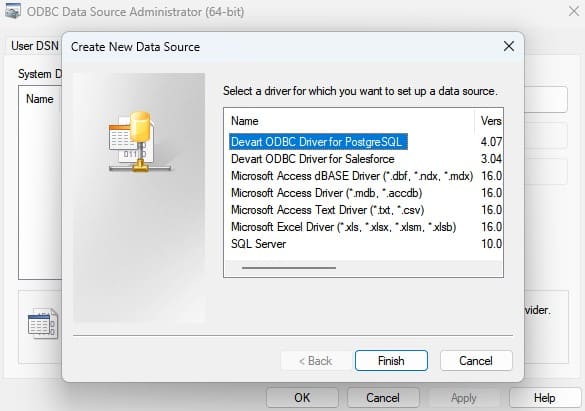
- Now, fill in the required connection parameters for your POS database:
- Data Source Name: Give your data source a name (e.g., “POS_Store_SFApps.info”). This is an arbitrary name you choose to identify the DSN.
- Database: The name of the POS database (for example, POS_Store_SFApps.info).
- User ID and password: Credentials for connecting to the database. Use a user that has read/write access to the tables you need to sync.
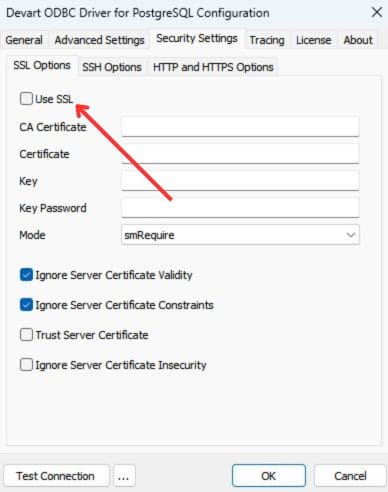
- SSL or encryption settings (optional): If your PostgreSQL server requires SSL/TLS, enable the SSL option and provide any needed certificates or keys.
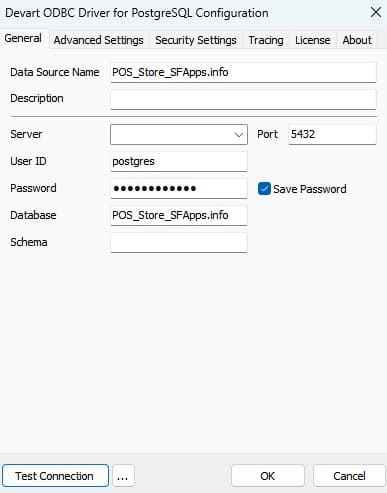
- After entering these details, click “Test Connection”. This will attempt to connect to the PostgreSQL database with the info provided. If everything is correct, you should see a “Connection successful” message. If it fails, double-check the details.
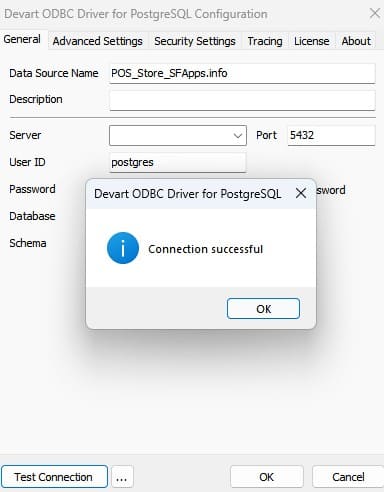
- Once the test passes, click “OK” to save the DSN.
2. Create a Salesforce ODBC DSN:
- In the ODBC Data Source Administrator, again click “Add…” (still on the System DSN tab for consistency). This time, select Devart ODBC Driver for Salesforce and click “Finish”. A setup dialog specific to Salesforce will appear.
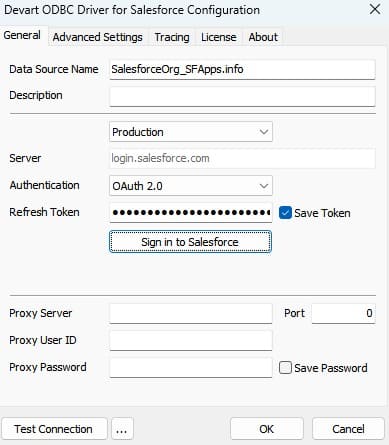
- In the Salesforce ODBC setup, you’ll need to provide Salesforce connection details. By default, Devart’s driver uses OAuth 2.0 for authentication, which is a secure way to connect. You have two main options here:
- You will be prompted to log in to Salesforce via a browser window. Choose the environment (Production or Sandbox), then click an OAuth login button (if provided). Enter your Salesforce credentials in the web form that appears. Once authorized, the driver will obtain an OAuth token and save it: no need to manually enter a username/password in the DSN if using OAuth.
- Once credentials are set, again click Test Connection. The driver will attempt to connect to Salesforce’s API using the provided info. If successful, you’ll get a confirmation. This means the Salesforce ODBC driver can reach Salesforce over HTTPS (the driver connects via the Salesforce API securely over the internet).
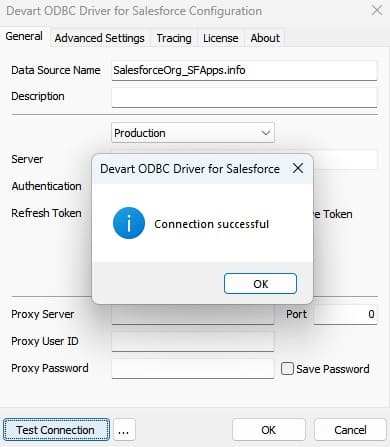
- Click “OK” to save the Salesforce DSN after a successful test.
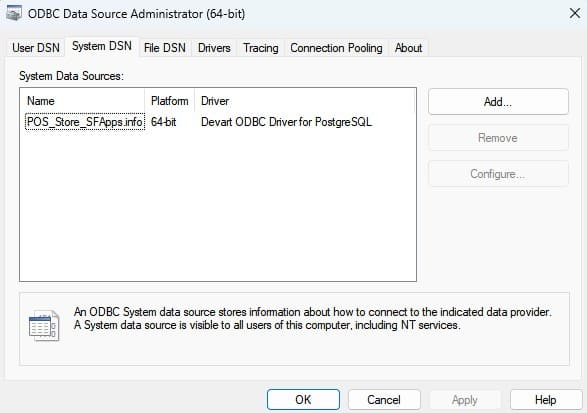
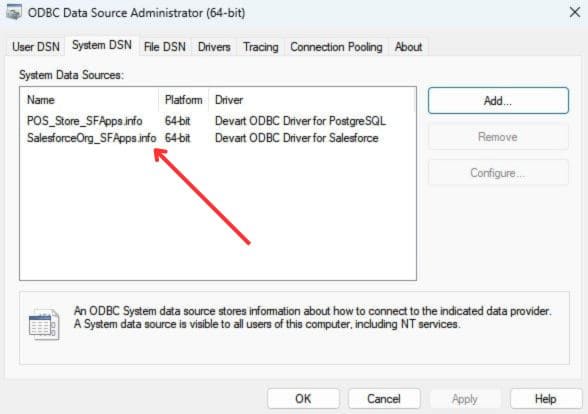
At this point, we have two ODBC data sources configured: one for the PostgreSQL POS database and one for Salesforce. These are the bridges that allow ODBC-capable tools or integration software to talk to both systems.
Step 5: Test the ODBC Connections
After configuration, it’s crucial to verify connectivity – essentially, how to check if the ODBC connection is working properly:
1. Using ODBC Administrator: As we did above, the simplest way is to press the “Test Connection” button in each DSN setup dialog. If you missed doing so earlier, reopen the ODBC Data Source Administrator, select your DSN, and click “Configure”, then use “Test Connection”. A success message indicates the DSN can connect to the target. This step answers the question of how to check ODBC connection status directly through the ODBC tool: you get immediate feedback on whether it connected or not.
2. Using an SQL Query Tool: You can also perform an ODBC check connection status outside the DSN setup. For example, open a tool like Excel, Power BI, or DBeaver that can use ODBC. Try creating a connection using the DSN you set up. Check if the ODBC connection is open and you can preview data (e.g., retrieve a few rows from the POS database or a Salesforce object), then you’ve confirmed the ODBC connection is working.
3. Via Command Line: On Windows, you could use PowerShell to attempt a connection, but that’s optional. The goal is simply to ensure our DSNs are functional.
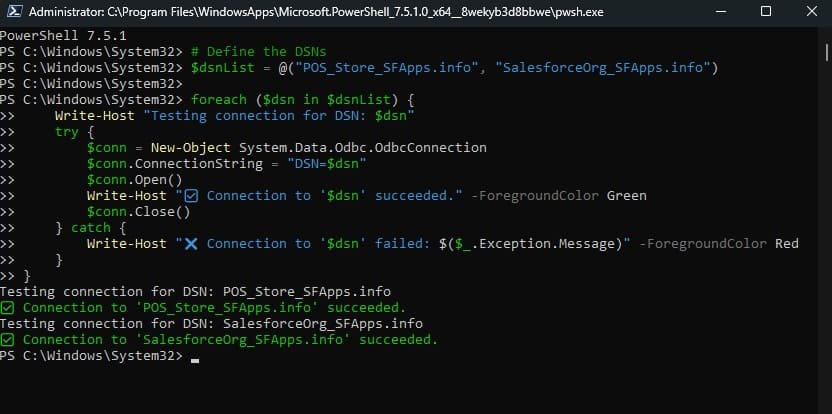
If the connection fails, check that the credentials are correct. For Salesforce DSN, verify the account has API access and that the security token (if used) is correct.
Also, pay attention to the ODBC connection timeout setting. By default, the Devart drivers use a 15-second connection timeout. If your network is slow or the database is under heavy load, a connection might time out before it establishes. You can configure this Connection Timeout value in the DSN settings.
By testing and possibly tweaking the timeout, you check ODBC connection reliability and ensure it stays stable. Once both DSNs report successful connections, you’re ready to move on to syncing data.
Step 6: Map POS Tables to Salesforce Objects
With connectivity in place, the next step is mapping what data goes where: essentially aligning Salesforce and POS data models. This step is more about planning and configuration within your integration tool or custom script.
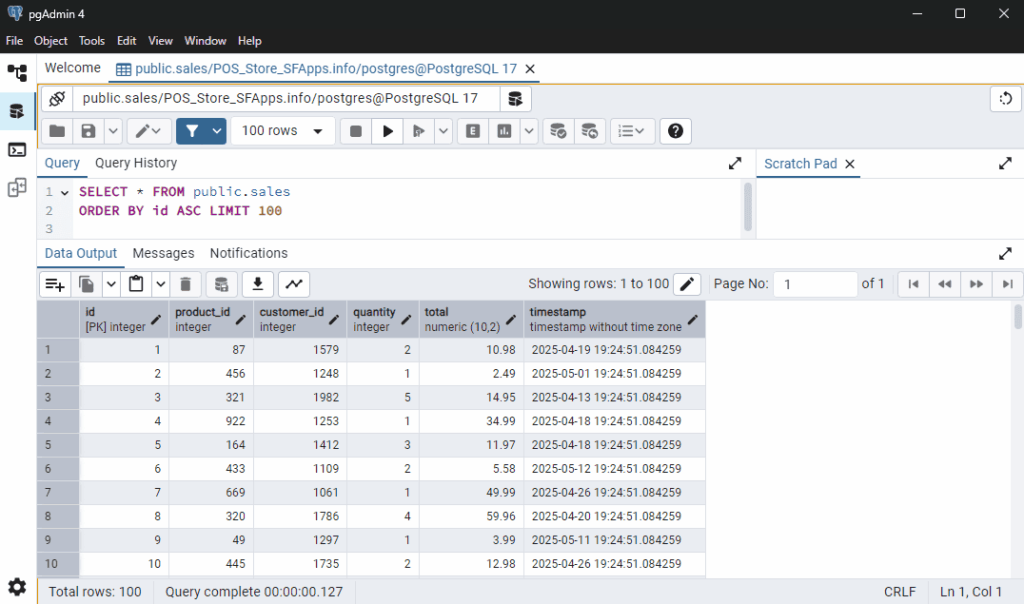
1. Identify Key Data Entities: Determine which tables in the PostgreSQL POS database need to be reflected in Salesforce. Common examples:
- Products: A table listing products with their name, price, and stock level. In Salesforce, you might map this to the Product2 object (if using Salesforce products) or a custom object.
- Sales transactions: A table of sales or orders in the POS. Depending on how you model sales in Salesforce, this could map to a Salesforce custom object like Sales_Transaction__c or perhaps to Opportunities or Orders in Salesforce.
- Customers: If your POS stores customer info (loyalty program, etc.), map that to Salesforce Contact or Account records. For example, a customer record in POS might update a Contact in Salesforce.
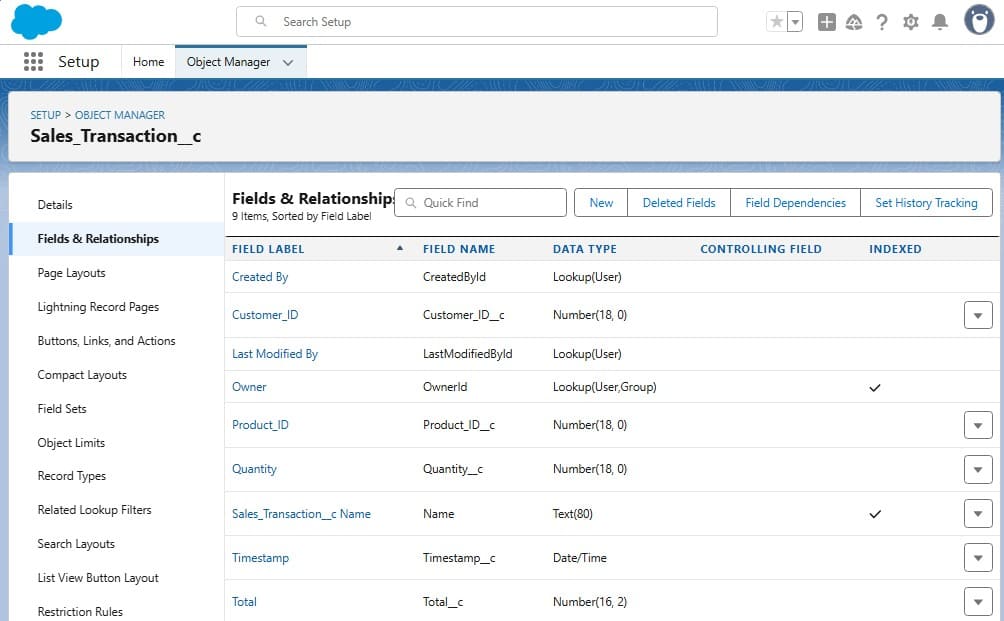
2. Create Corresponding Salesforce Fields/Objects: Ensure Salesforce has a place for each piece of POS data. You might need to create custom fields or objects in Salesforce to hold data that doesn’t naturally fit into standard objects. For instance, if you want to store information about sales, you might create a custom object Sales_Transaction__c in Salesforce with fields for product, quantity, total, etc.
3. Field mapping: For each POS column, decide the target Salesforce field. Pay attention to data types, but one advantage of using ODBC is that much of the data type conversion is handled by the driver. Devart’s drivers support advanced data conversion. This means you usually don’t have to manually convert data formats – the driver ensures PostgreSQL ODBC driver configuration, and the Salesforce driver handles the translation.
Step 7. Choose an Integration Method
1. How will you perform the sync? While the Devart ODBC drivers give you the bridge, you need a tool to move the data across it. Pick whichever of these approaches best fits your skills and budget:
- Lightweight code or scripts – If you’re comfortable with basic scripting, you can use a small program written in Python, PowerShell, or C# to read data from your POS system and send it to Salesforce. These scripts connect through the ODBC drivers and handle the transfer. You can also set them to run automatically on a schedule using built-in tools like Task Scheduler.
- Visual ETL/IPaaS software – Skyvia, Talend, or Microsoft SSIS can treat the PostgreSQL DSN as an ODBC source and the Salesforce DSN as an ODBC destination. You simply drag-and-drop the mapping, set the schedule, and the ETL engine performs batching, retries, and logging.
2. Sync Strategy (Timing and Direction): Decide if the integration is one-way or two-way. Often, POS to Salesforce is one-way (pushing sales data up to CRM). However, you might also pull data down (e.g., pulling customer info from Salesforce to POS for loyalty or pulling product updates). Devart drivers allow bi-directional connectivity, meaning you can both read and write Salesforce data using SQL.
3. Test the mapping on a small scale: It’s wise to do a trial run. For example, take one store’s one day of sales and try inserting those into Salesforce via the ODBC connection. Verify that the data appears correctly in Salesforce (check a few records). This ensures your field mappings and data transformations are correct.
Step 8: Ensure Secure Data Transmission
When integrating systems, especially across the internet, security is paramount. We need to ensure that the data moving from the POS database to Salesforce (and vice versa) is protected:
1. PostgreSQL ODBC connection security: If your POS database server supports SSL/TLS encryption, enable it. In the PostgreSQL ODBC DSN setup, there is a checkbox for SSL. This will encrypt the connection from the store’s database to the ODBC driver, preventing eavesdropping on sensitive information (like sales figures or customer details) during transit. If your POS is on the same local network as the integration machine, encryption is less critical, but it’s still a good practice, especially if any part of the route goes over public networks.
2. Salesforce ODBC connection security: Salesforce connections via the Devart driver are inherently secure. The driver uses Salesforce’s API, which is always HTTPS (SSL encrypted). Devart’s Salesforce ODBC uses OAuth or secure token authentication and connects over HTTPS without requiring any extra setup. This means data going to and from Salesforce is encrypted using TLS.
3. User permissions: Use least-privilege principles. The PostgreSQL user for the ODBC connection should have rights only to the needed tables, not full admin of the database. Likewise, the Salesforce integration user (if you created a dedicated user account for this) should have minimal permissions – just enough to read/write the objects you intend to sync.
4. Audit and logs: It’s a good idea to keep logs of what data was synced when. Many ODBC integration approaches (like scripts or ETL tools) will allow you to log successes and errors. Monitoring these logs helps you quickly identify if something goes wrong (for example, if the connection fails on a given day, you’ll catch it and can re-run the sync).
By adhering to these security measures, the Salesforce POS integration will be not only effective but also safe. You’ll have a robust pipeline that securely transmits sales and inventory data, leveraging SSL/TLS to protect information in transit.
In this example, the POS system integrated with Salesforce gives the company immediate insight. They notice, for instance, that a certain product is selling out by midday in several locations – and because the data is in Salesforce instantly, the inventory planners get alerts and reroute stock by the afternoon, avoiding lost sales. This is a significant improvement over the old way. It demonstrates the power of connecting Salesforce and POS through ODBC: better responsiveness, centralized data, and less manual work.
FAQs About Salesforce POS Integration Using ODBC Drivers
Finally, let’s address some common questions related to Salesforce POS system integration using ODBC:
1. What is the role of the Devart ODBC drivers in Salesforce POS integration?
Devart ODBC drivers act as the communication bridge between your PostgreSQL POS database and Salesforce. They make both systems accessible using standard SQL queries and provide the ability to create flexible integration solutions.
2. Do I need to be a developer to integrate a POS system with Salesforce via ODBC?
Not necessarily. While some technical steps are involved (installing drivers, configuring DSNs), you don’t have to write complex code. Many integration tools offer visual interfaces to map fields between the POS and Salesforce. If you can work through the ODBC Data Source setup and perhaps use an ETL tool or even Microsoft Excel, you can achieve basic integration.
Of course, for advanced automation (like custom scripts that run every hour), having some programming or IT support helps. But overall, ODBC makes it simpler by providing a standard way to connect the two systems without deep software development.
3. How secure is this ODBC-based integration between Salesforce and a POS database?
It can be very secure if configured properly. ODBC is just a data connection interface – security depends on how you set up the connections:
- The Salesforce ODBC driver connects over HTTPS (which is encrypted) and can use OAuth for safe authentication. No sensitive data is transmitted in plain text.
- The PostgreSQL ODBC connection can be configured to use SSL/TLS encryption, ensuring the data traveling from your POS system is protected.
4. What data can I sync between a POS system and Salesforce?
Virtually any data you have in the POS could be synced to Salesforce – it depends on your business needs: Sales Transactions, Inventory Levels, Customer Information, Product Catalog, Payments, and Loyalty.
Essentially, any table in the PostgreSQL POS can map to an object in Salesforce. The key is having a place in Salesforce for it (standard or custom object) and avoiding duplication or conflicts if data flows both ways.
5. How frequently should I sync data, and will this integration support near real-time updates?
The frequency of sync is up to your business needs and technical capacity. A common approach is to run a batch sync nightly. This is easy on system load and often sufficient for reporting and next-day analysis. Many retailers start here, replacing their weekly manual import with an automated nightly ODBC sync, for example.
If you need more immediate visibility, you can increase the frequency – say hourly or every 15 minutes. The ODBC drivers and a decent integration script can handle this, as long as the volume of data each time isn’t huge. With a stable connection, an hourly sync of new transactions is quite feasible.
Bringing It All Together: Secure and Scalable Salesforce POS Integration
Bridging a store-level POS system with Salesforce is a game-changer for retail operations. In this article, we tackled the challenge of Salesforce POS integration using Devart’s ODBC drivers for PostgreSQL and Salesforce. We started by recognizing the pain of manual CSV uploads and delayed insights, and then we walked through a comprehensive solution, from installing the ODBC drivers and configuring connections to mapping data and ensuring security.
With this setup, your POS for Salesforce integration with Salesforce becomes a reality: the local sales and inventory data flows into Salesforce seamlessly, giving your business a unified, real-time view of performance. Instead of waiting days for reports, managers can pull up Salesforce dashboards anytime to see live POS figures. The integration is secure (using SSL/TLS and Salesforce’s encrypted channels) and reliable, thanks to the robust ODBC connectors.
Crucially, this is a solution that empowers data-driven decision making. When POS systems that integrate with Salesforce are in place, you can leverage Salesforce’s powerful analytics on your in-store data, improve accuracy by eliminating manual data entry, and react faster to trends – all of which are proven to boost retail outcomes. The statistics don’t lie: integrated systems outperform siloed ones, whether in conversion rates or data accuracy.
Now, armed with this knowledge, you can eliminate the data disconnect in your retail chain and ensure that every sale at the register is reflected in your Salesforce CRM.

Mykhailo is a Salesforce Certified Platform Administrator with development experience in the fintech field. Since 2021, he has gained the Double Star Ranger rank on the Salesforce Trailhead education platform, where he acquired 26 Superbadges in Business Administration, Process Automation, Security, and more. With a decade of expertise in consulting and compliance, he aspires to translate complex technical concepts into accessible content, helping organizations make the most of Salesforce. Mykhailo is passionate about using technology for everyday needs, enjoys reading sci-fi and non-fiction books, and playing video games. He also has an interest in history and outdoor activities such as hiking, camping, and kayaking.
 Previous Post
 Next Post